Home › Free filet patterns › Nested Triangle Corner
Nested Triangle Corner
Nested right-angle bands step down parallel to the diagonal, framing the corner in concentric lines. A corner motif for a collar or handkerchief edge; each band meets the shaped edge mid-line, so verify the decrease against the chart every row to keep the lines unbroken.
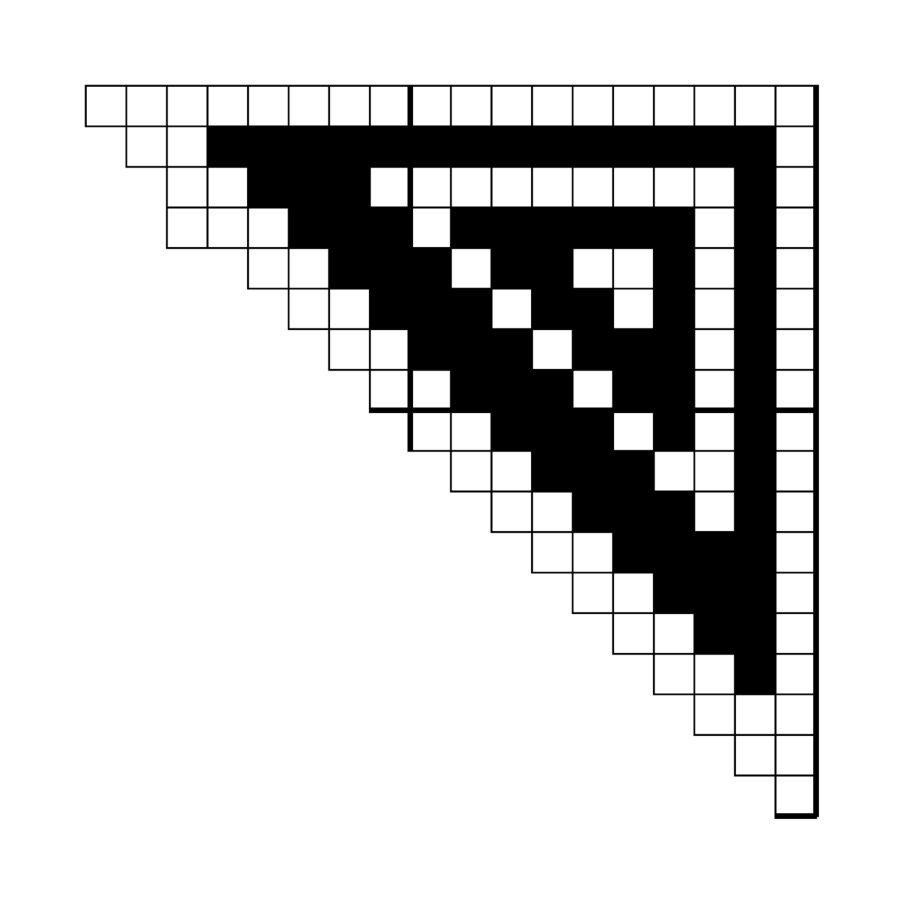
VINTAGE · 1914 CORNERS & INSERTIONS
Download chart (SVG) Start crocheting
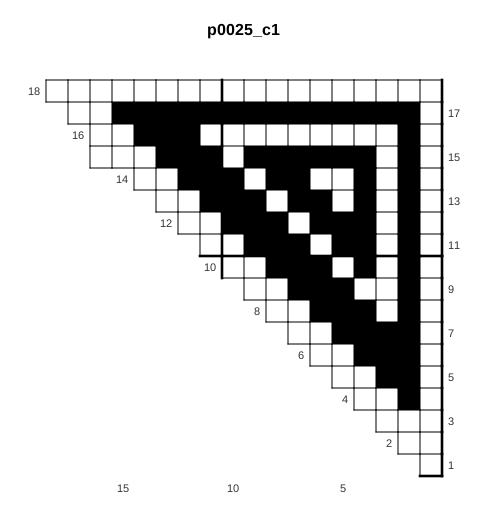
Written instructions
Row 2: ch 5, 2 open meshes. Turn. [Shaping: starts 1 mesh wider than the row before.]
Row 3: ch 5, 3 open meshes. Turn. [Shaping: ends 1 mesh wider than the row before.]
Row 4: ch 5, 2 open meshes, 1 filled mesh, 1 open mesh. Turn. [Shaping: starts 1 mesh wider than the row before.]
Row 5: ch 5, 1 open mesh, 2 filled meshes, 2 open meshes. Turn. [Shaping: ends 1 mesh wider than the row before.]
Row 6: ch 5, 2 open meshes, 3 filled meshes, 1 open mesh. Turn. [Shaping: starts 1 mesh wider than the row before.]
…
Show all 18 rows
Row 2: ch 5, 2 open meshes. Turn. [Shaping: starts 1 mesh wider than the row before.]
Row 3: ch 5, 3 open meshes. Turn. [Shaping: ends 1 mesh wider than the row before.]
Row 4: ch 5, 2 open meshes, 1 filled mesh, 1 open mesh. Turn. [Shaping: starts 1 mesh wider than the row before.]
Row 5: ch 5, 1 open mesh, 2 filled meshes, 2 open meshes. Turn. [Shaping: ends 1 mesh wider than the row before.]
Row 6: ch 5, 2 open meshes, 3 filled meshes, 1 open mesh. Turn. [Shaping: starts 1 mesh wider than the row before.]
Row 7: ch 5, 1 open mesh, 4 filled meshes, 2 open meshes. Turn. [Shaping: ends 1 mesh wider than the row before.]
Row 8: ch 5, 2 open meshes, 3 filled meshes, 1 open mesh, 1 filled mesh, 1 open mesh. Turn. [Shaping: starts 1 mesh wider than the row before.]
Row 9: ch 5, 1 open mesh, 1 filled mesh, 2 open meshes, 3 filled meshes, 2 open meshes. Turn. [Shaping: ends 1 mesh wider than the row before.]
Row 10: ch 5, 2 open meshes, 3 filled meshes, 1 open mesh, 1 filled mesh, 1 open mesh, 1 filled mesh, 1 open mesh. Turn. [Shaping: starts 1 mesh wider than the row before.]
Row 11: ch 5, 1 open mesh, 1 filled mesh, 1 open mesh, 2 filled meshes, 1 open mesh, 3 filled meshes, 2 open meshes. Turn. [Shaping: ends 1 mesh wider than the row before.]
Row 12: ch 5, 2 open meshes, 3 filled meshes, 1 open mesh, 3 filled meshes, 1 open mesh, 1 filled mesh, 1 open mesh. Turn. [Shaping: starts 1 mesh wider than the row before.]
Row 13: ch 5, 1 open mesh, 1 filled mesh, 1 open mesh, 1 filled mesh, 1 open mesh, 2 filled meshes, 1 open mesh, 3 filled meshes, 2 open meshes. Turn. [Shaping: ends 1 mesh wider than the row before.]
Row 14: ch 5, 2 open meshes, 3 filled meshes, 1 open mesh, 2 filled meshes, 2 open meshes, 1 filled mesh, 1 open mesh, 1 filled mesh, 1 open mesh. Turn. [Shaping: starts 1 mesh wider than the row before.]
Row 15: ch 5, 1 open mesh, 1 filled mesh, 1 open mesh, 6 filled meshes, 1 open mesh, 3 filled meshes, 3 open meshes. Turn. [Shaping: ends 2 meshes wider than the row before.]
Row 16: ch 5, 2 open meshes, 3 filled meshes, 9 open meshes, 1 filled mesh, 1 open mesh. Turn.
Row 17: ch 5, 1 open mesh, 14 filled meshes, 2 open meshes. Turn. [Shaping: ends 1 mesh wider than the row before.]
Row 18: ch 5, 18 open meshes. Fasten off. [Shaping: starts 1 mesh wider than the row before.]
Stitch along
Tick rows off as you go — progress is saved on this device only.
More from the 1914 collection
About these patterns. Crochetpatternmaker.com is an independent site. The vintage charts in our library are restored from The Priscilla Filet Crochet Book, No. 2 (Priscilla Publishing Company, Boston, 1914), a work in the public domain; we re-charted each design from the original plates and cross-checked it against the printed mesh counts. We are not affiliated with any past or present publisher. The chart maker runs entirely in your browser — images you upload never leave your device. Finished sizes are estimates: filet gauge depends on your thread, hook and tension, so work a small swatch first.